Here you will find guides how to configure the database clients (DB2 and SQL Server)
on Windows and Linux.
PMF on Linux
PMF on Windows
Connecting to a DB2 database via the native client (Client Application
Enabler, aka DB2 Connect)
Consult a search engine and look for ""ibm data server runtime
client". This should take you to IBMs download area, where you can download
files in the form of "ibm_data_server_runtime_client_win64_v11.1.exe" (free
registration required).
Install the driver and start PMF. In the login window, select "DB2" and
"<Catalog DB>"
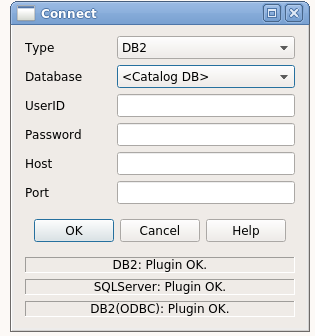
Click OK. This will take you to a new dialog where you can catalog new nodes
and databases or catalog a database on an existing node:
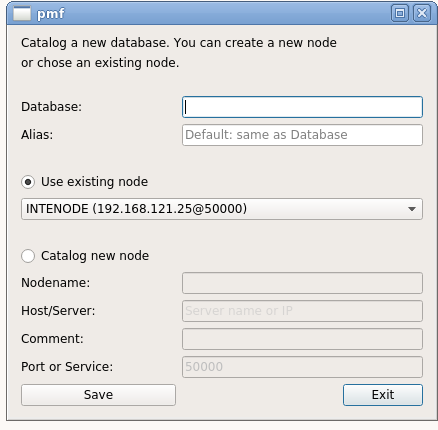
You will see all cataloged databases in PMF's connection menu. When first
connecting to a DB2 database, a BIND file needs to be bound to this
database. This will happen automatically.
Connecting to a DB2 database via OBDC on Windows
Generally I would recommend connecting PMF via the native DB2 client
(see above) because it's faster and has a lot more options. Connecting via
ODBC is recommended only if you do not want to install the native client on
your system.
Setup ODBC for DB2 on Windows
This is a rather complicated affair.
Step 1:
Consult a search engine and look for "IBM Data Server Driver for ODBC
and CLI".
Download the driver from IBM (free registration required). The ODBC driver
is included in "IBM Data Server Driver for ODBC and CLI", disguised as
Fixpack (it's a bit confusing).
What you need to download is in the form of
DSClients-XXXX-odbc_cli-XX.X.XXX.XXX-FPXXX
an example would be "DSClients-ntx64-odbc_cli-10.5.1000.898-FP010 "
You can either download the 32bit
or 64 bit version.
Step 2:
Unzip the driver in a suitable directory, for example "c:\clidriver"
Navigate to "c:\clidriver\bin" and in a console window as
Administrator run
db2oreg1 -i
db2oreg1 -setup
You need to be Administrator for this, else "db2oreg1" will fail without any
error messages. The commands above will create the file
"c:\windos\ODBCINST.INI"
Step 3:
Add the subdirectory "clidriver\bin" to your PATH environment
variable
Step 4:
Reboot
Step 5:
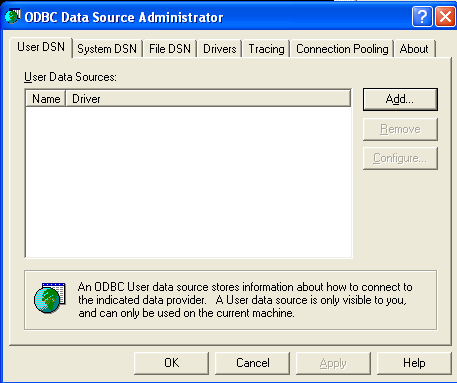
If you installed the driver for 32bit ,
navigate to "\windows\SYSWOW64" and
run "odbcad32.exe"
If you installed the driver for 64bit,
navigate to "\windows\system32" and
run "odbcad32.exe"
Click "Add" ...
You should see an IBM DB2 ODBC DRIVER:
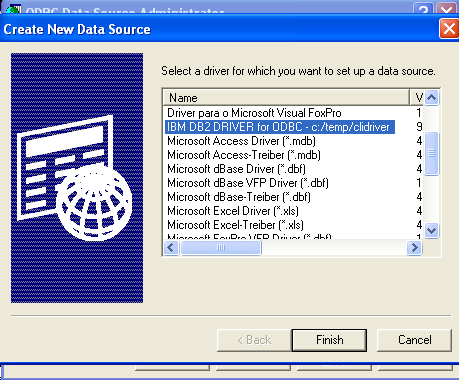
Select this driver, click "Finish".
Enter a "Data source name" and click "Add"
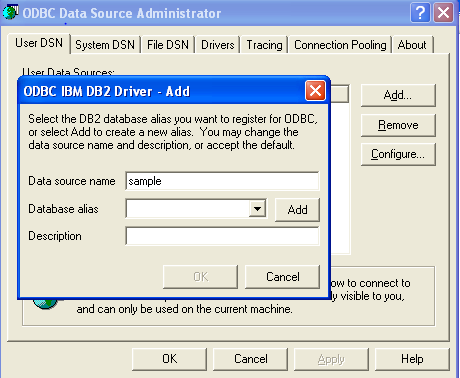
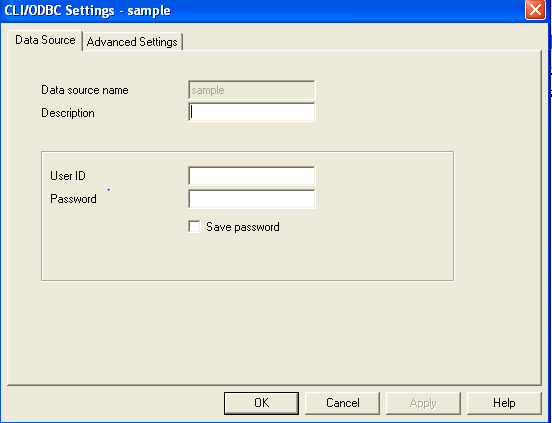
Optionally, enter a description and User/Password:
Select the "Advanced Settings" tab and click "Add"
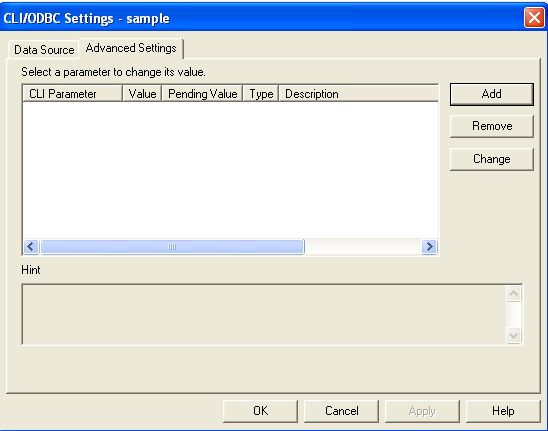
You will need to enter a couple of values manually.
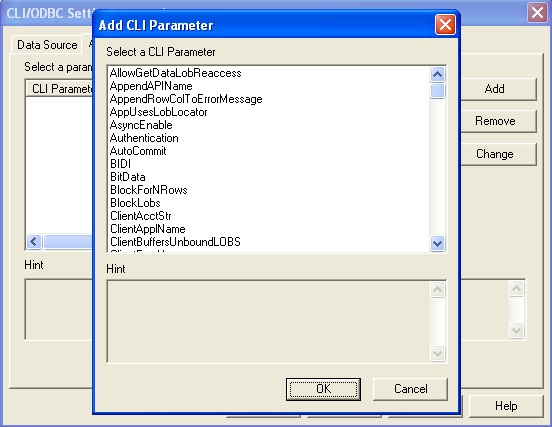
Select and edit values for "Database", "Protocol", "Hostname" and
"Port"
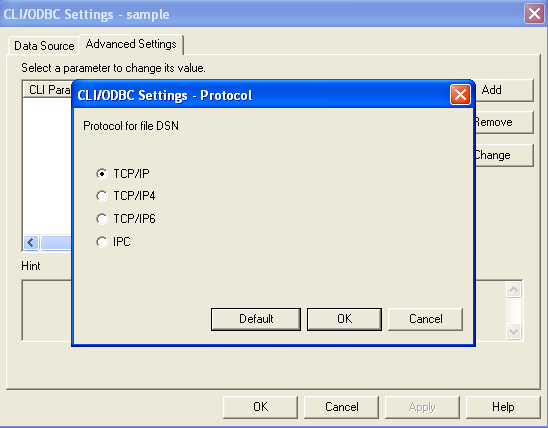
In the end it should look something like this:
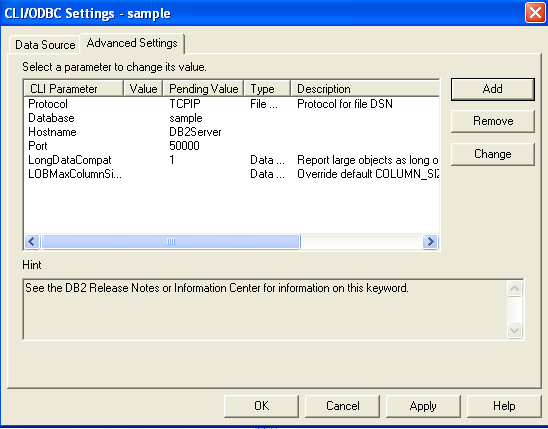
If you have LOBs in your database, you might want to configure
"LongDataCompat".
Repeat these steps for every database you want to enable for ODBC-access.
Step 6
Start PMF, select "DB2(ODBC)" in the login window and enter the login
information (database, user, password).
Connecting to a DB2 database via OBDC on Linux
Generally I would recommend connecting PMF via the native DB2 client
(Client Application Enabler or DB2 Connect) because it's faster and has a
lot more options.
Connecting via ODBC is recommended only if you do not want to install the
native client on your system.
Detailed intructions for DB2/ODBC can be found here: unixODBC
Basically, what you need to do is go to IBM ODBC driver (free registration required at some
point)
then find "IBM Data Server Driver for ODBC and CLI" for your DB2 version and
architecture (either 64bit or 32bit) .
Next, click on "View all" and download the driver.
Untar the downloaded file, and you will see a directory structure like
"[location]/odbc_cli/clidriv"
On my systems, I copied everything under "odbc_cli/clidriv" into the
directory "/opt/ibm/db2/[DB2-version]" (create it if it does not exist)
The structure should then look like this:
/opt/ibm/db2/v10.1/
	/adm
	/bin
	/bnd
	....
With newer versions of DB2, configuring ODBC comes down to these steps:
- Edit ".bashrc" and add these lines:
if [ -f /home/[user]/sqllib/db2profile ]; then
       . /home/[user]/sqllib/db2profile
fi

DB2LIBPATH=:/opt/ibm/db2/V10.1
LD_LIBRARY_PATH=$LD_LIBRARY_PATH:"$DB2LIBPATH"
export LD_LIBRARY_PATH
Replace [user] with the instance owner's name. If "./home/[user]/sqllib"
does not exist, don't worry: For pure ODBC, you don't need it anyway.
- Create a file "db2cli.ini" in "/opt/ibm/db2/[DB2-Version]/cfg/". Add
these lines:
[sample]
Database=SAMPLE
Protocol=TCPIP
Port=50000
Hostname=ServerName
UID=
PWD=
- Edit the file "odbcinst.ini" and add these lines (make sure to set the
correct path for 'Driver'):
[DB2]
Description     = DB2 Driver
Driver      	= /opt/ibm/db2/V10.1/lib/libdb2.so
##Driver      	= /opt/ibm/db2/V10.1/lib32/libdb2.so
FileUsage       = 1
DontDLClose     = 1
- Finally, edit "odbc.ini" and add these lines:
[sample]
Description     = Test to DB2
Driver      	= DB2
As always, database names must not exceed 8 characters.
To test the connection, run
isql -v sample <user> <pwd>
General concept
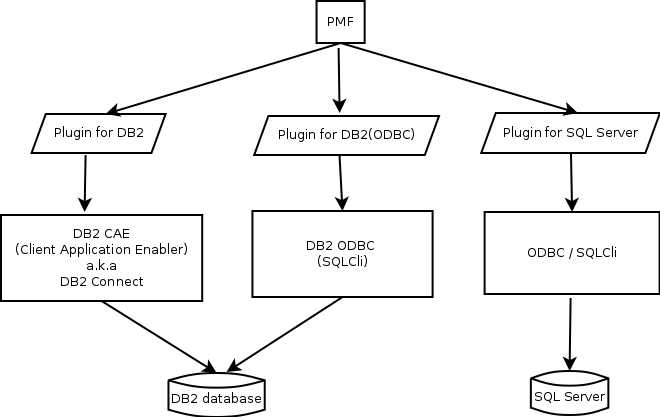
PMF consists of a GUI (GraphicalUserInterface) and currently three plugins to
connect to DB2 or Sql Server.
These plugins exist for both Linux and Windows. Here is the layout:
To connect to these databases, the client system needs to be prepared.
For DB2, the CAE (ClientApplicationEnabler), sometimes called DB2 Connect or
simply DB2 Client must be installed. This is easily done through the DB2
installation process.
For systems without DB2 CAE, it's possible to connect via ODBC.
For Sql Server, OBDC needs to be configured. Depending on the clients
operating system (Windows or Linux), this is a bit more complicated.
Naturally, the server side needs some configuration too (user rights, open
ports etc).
All this is covered in more detail in the corresponding chapters, see here.
Connecting to SQL Server on Linux
Microsoft is offering an ODBC driver for Linux (closed source), but
at least for me, this didn't work well.
Instead, I'm using the tools described here. This guide should help you set
up a connection to Sql Server from your Linux machine.
First, install a couple of packages:
- Freetds
- unixODBC or unixODBC2
- unixODBC-dev (development files)
The names may vary on different systems.
Next, we need to edit three files.
- /etc/freetds/freetds.conf or /etc/freetds.conf, depending on your
distribution
- /etc/odbc.ini
- /etc/odbcinst.ini
These files should have been installed through the packages above. If some
of them are missing, consult a search engine.
Perform the following steps as root.
Let's start with odbcinst.ini: Open it in your favorite editor and
add these lines (params in red are
referenced across files):
#
#   Apparently, putting blanks before and after "=" is rather important...
#

[mssql-driver]
Description = MS SQL Database
Driver     = [path to]/libtdsodbc.so.0
Setup      = [path to]/libtdsodbc.so.0
UsageCount=1
[mssql-driver] is just an example, you
can use your own marker, but make sure that you use it consistently in odbc.ini
below
Next, edit odbc.ini and add these lines:
[mysqlsrv01]
Description = ...
Driver = mssql-driver
Servername = mySqlConn
Database = SomeDB [default database, optional]
mysqlsrv01 is the string that we will
use to connect to the server later.
mySqlConn is referenced in freetds.conf
below
And finally, in freetds.conf add these lines:
[mySqlConn]
	host = hostname.domain - or - ip
	client charset = UTF-8
	tds version = 7.2
	use ntlmv2 = yes
	port = 1433
If you have a named instance (e.g. HostName\SQLEXPRESS01), you can
set it in freetds.conf
[mySqlConn]
	host = hostname.domain - or - ip
	client charset = UTF-8
	tds version = 7.2
	use ntlmv2 = yes
	instance = SQLEXPRESS01
	# instance requires port 1434/UDP to be open on the server
	# Do not set a port here: port and instance are mutually exclusive
"host" is of course the Windows machine where Sql Server runs. Try "ping
[host]" to check that name resolution works.
Currently you should use TDS version 7.2
(especially if you have XML columns in your databases) when you configure
ODBC for usage with PMF. TDS 8.0 was renamed to TDS 7.2, but a lot of
documentation still refers to 8.0
Side note: To get name resolution working in Linux, install the packages
"samba winbind" and "nss_wins".
Edit /etc/nsswitch.conf and find the line that starts with
"hosts:". Add "WINS" (without quotation) at the end of this line.
Example: Simply change
hosts: mdns4_minimal files nis dns myhostname mdns4
to
hosts: mdns4_minimal files nis dns myhostname mdns4 wins
Make absolutely sure that there are no typos!
You can test your configuration in the command line (as root):
#osql -S mysqlsrv01 -U [username] -P [password]
If this is successful, you may now start PMF. You will see your newly
created connection ("mysqlsrv01") in the Login menu.
If you get errors, read on.
A few notes and hints and possibly a little help:
Setting up SQL Server
You will need to configure the Windows server and Sql Server:
- Configure the Windows firewall to accept connections on port 1433
- For named instances, port 1434/UDP needs to be open
- Use "Sql Server Configuration Manager" to enable TCP/IP and named
pipes
- Use "Sql Server Configuration Manager" to assign the TCP/IP port
number 1433 to the SQL Server Database Engine
- Use "Sql Server Management Studio" to create a user, select "SQL
Server authentification" (not "Windows authentification")
You can use nmap (from a Linux machine) to check if the port is open:
# nmap w7pro64 -p 1433
(replace w7pro64 with the name of your Windows server). It should give
something like
Starting Nmap 6.40 ( http://nmap.org ) at 2014-07-11 22:13 CEST
....
PORT     STATE SERVICE
1433/tcp open  ms-sql-s
...
The port should be marked as "open".
Tabbing
When editing the files, tabbing or spaces appear to be important
Error "no IP address found for..."
If you get an error "no IP address found for [host]", you can try editing /usr/bin/osql
Open the file (as root) and search for "no IP address found" (around line
350)
ADDRESS=$(host ${HOST} | awk '/has address/ {print $4}' | head -1)
if [ -z "${ADDRESS}" ]
then
	echo "$(basename $0): no IP address found for \"${HOST}\""
#	exit 1  <--- comment out this line (add "#")
fi
and comment out the line "exit 1". The code does a reverse DNS lookup and
this is not really necessary.
tds_version
TDS versioning can be a bit confusing because the nomenclature changed.
Generally you should use TDS version 7.2 (which was previously
called 8.0). Do not use 7.4 when you have GUIDs/UUIDs in your
tables.
Connecting
A successful connection (in a console) will look like this:
#osql -S mysqlsrv01 -U [username] -P [password]
checking shared odbc libraries linked to isql for default directories...
checking odbc.ini files
	reading /etc/odbc.ini
[mysqlsrv01] found in /etc/odbc.ini
found this section:
	[mysqlsrv01]
	Description=Some...
	Driver=mssql-driver
	Servername=mySqlConn
	Database=Repositories

looking for driver for DSN [mysqlsrv01] in /etc/odbc.ini
  found driver line: "	Driver=mssql-driver"
  driver "mssql-driver" found for [mysqlsrv01] in odbc.ini
found driver named "mssql-driver"

looking for entry named [mssql-driver] in /etc/odbcinst.ini
  found driver line: "	Driver     = /usr/lib/x86_64-linux-gnu/odbc/libtdsodbc.so"
  found driver /usr/lib/x86_64-linux-gnu/odbc/libtdsodbc.so for [mssql-driver] in odbcinst.ini
/usr/lib/x86_64-linux-gnu/odbc/libtdsodbc.so is an executable file

Using ODBC-Combined strategy
DSN [mysqlsrv01] has servername "mySqlConn" (from /etc/odbc.ini)

/etc/freetds/freetds.conf is a readable file
looking for [mySqlConn] in /etc/freetds/freetds.conf
found this section:
	[mySqlConn]
	    host = 192.168.0.87
	    client charset = UTF-8
	    use ntlmv2 = yes
	    tds version = 7.2
	    instance = SQLEXPRESS01
looking up hostname for ip address 192.168.0.87
osql: warning: no DNS hostname found for "192.168.0.87"
[....]
Configuration looks OK.  Connection details:

                   DSN:	mysqlsrv01
              odbc.ini:	/etc/odbc.ini
                Driver:	/usr/lib/x86_64-linux-gnu/odbc/libtdsodbc.so
       Server hostname:
               Address:

Attempting connection as moi ...
+ isql mysqlsrv01 moi cheffe -v
+---------------------------------------+
| Connected!                                |
|                                                   |
| sql-statement                              |
| help [tablename]                        |
| quit                                            |
|                                                   |
+---------------------------------------+
SQL>
Connecting to SQL Server via OBDC on Windows 32-bit and 64-bit systems
To connect to SQL Server with the Windows version of PMF, you need
to create an ODBC datasource.
It's very important to use the correct ODBC-manager, either for 32 bit or 64
bit applications.
The standard 64-bit ODBC manager will configure connections for 64 bit
applications, which is fine for PMF 64 bit.
For the 64 bit version of PMF:
Type "odbc" in the Windows-search field, this will bring up the correct
ODBC-manager.
For the 32 bit version of PMF:
On 32-bit Windows, use
c:\WINDOWS\system32\odbcad32.exe
On 64-bit Windows, use
c:\windows\SysWOW64\odbcad32.exe
This will bring up the ODBC manager for either for 32 bit or 64 bit
applications (they look the same):
Continue to setup your connections:
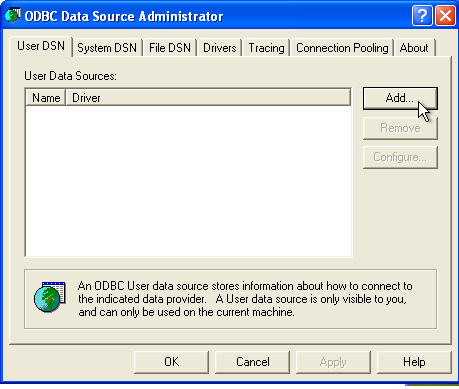
Select either "System DSN" or "User
DSN" and click "Add",
this will bring up the next menu:
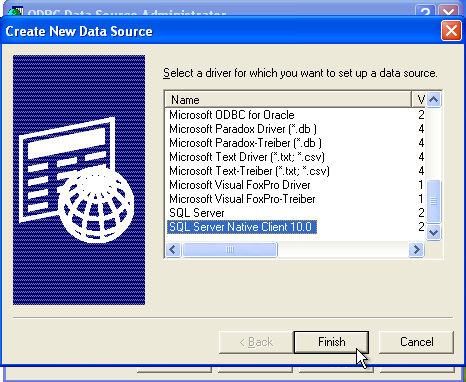
Select "SQL Server Native Client" with the highest version and click
"Finish".
(Note: You may have to install "SQL Server Native Client" first)
In the next dialog you need to provide a server name:
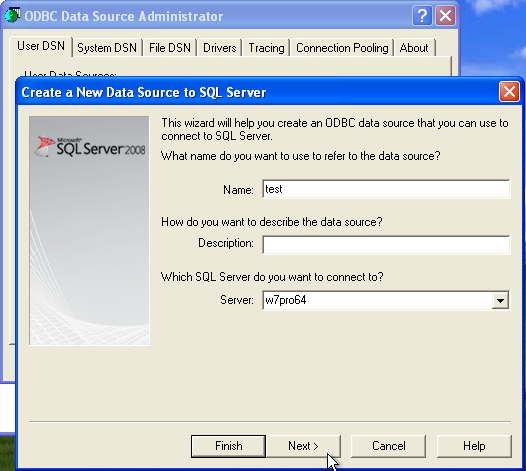
Give the connection a name, in this example it's simply "test".
In the next step, chose the authentication mode.
This depends on your environment, so you may have to try
out both options:
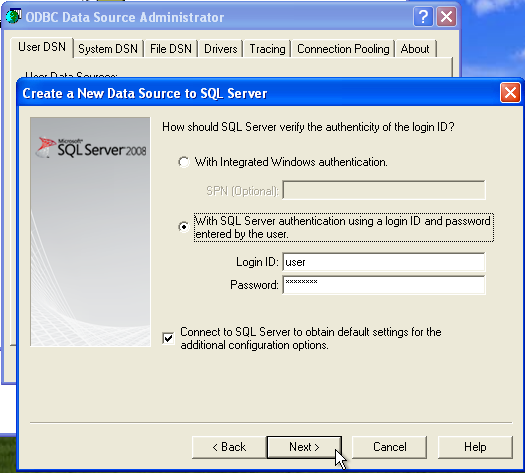
Click "Next" as long as it takes fo finalize the assistant.
In the last step, test your configuration:
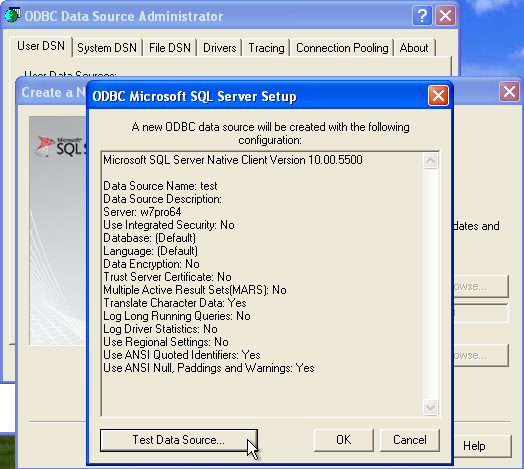
If the test was successful, start PMF, select "SQL Server"
and select the connection you just created.
Accessing an MDF file on 64 bit Windows with PMF via ODBC
If you want to manipulate data in an mdf file, you will need to set
up ODBC on the Windows machine first.
PMF for Windows is a 32 bit application, so on 64 bit Windows you need to
start the correct ODBC manager.
The standard ODBC manager will configure connections for 64 bit applications
and if you
try to use such a connection with PMF, you'll get an error along the lines
of "wrong architecture".
Interlude: If you are
using PMF 32 bit:
For 32 bit applications it's very important to use the
correct ODBC-manager.
On 32-bit Windows, use
c:\WINDOWS\system32\odbcad32.exe
On 64-bit Windows, use
c:\windows\SysWOW64\odbcad32.exe
This will bring up the ODBC manager for 32 bit applications.
End interlude.
Continue to setup your connections:
Select "User DSN" or "System DSN" and
click
"Add", this will bring up the next menu:
Select the highest version of "SQL Server Native Client" and click "Finish".
(Note: You may have to install "SQL
Server Native Client" first)
In the next step, give the connection a name and select a server.
Hint: You may have to experiment a bit here: For the server name, try
"(localdb)\v11.0" (v11.0 being the
version of the SQL driver, you may have to change that) first. If this does
not work, you might try "localhost" or the machine's name.
The connection name "test" is later used to connect with PMF.
Click "Next" twice to bring up this menu:
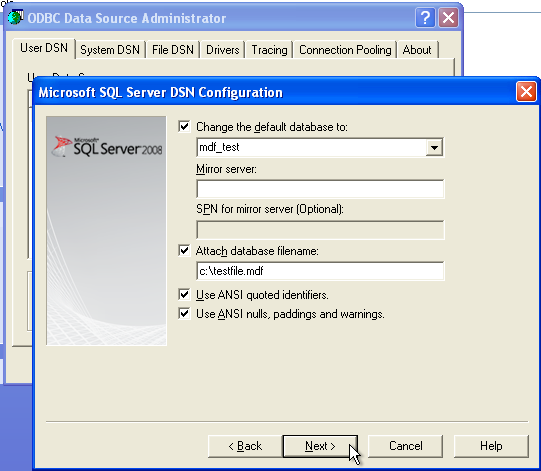
Enable "Change standard database to" and enter a name ("mdf_test" in this
example). Do NOT use the name of an existing database here!
Enter path and name of your mdf file.
Click "next" as long as it takes to finalize the assistant. In the last step
you have the option to test the new connection.
Connect PMF
If everything works, use the connection name in PMF to connect to
the database in the mdf file:
Select "SqlServer" and type in "test"